Jump to content


Photo
- - - - -

Ninite - AutoInstalls Freeware apps


  • Please log in to reply
5 replies to this topic

#1 TheHive

TheHive

    Platinum Member

  • .script developer
  • 4199 posts

Posted 24 October 2009 - 09:55 PM

I had a chance to test it. All you do is go to the site
http://ninite.com/
And then tick the programs you want auto installed. It creates a small Installer. Then When you click on it.
The programs download and install automatically. Prettysweet. Saves a lot of time doing it manually.

I wish it would download them and keep them in its own folder so you wouldnt have to redownload them anytime you need to install them. Seems like a bit of wasted bandwidth.

Before
Before.jpg

After - Look at Desktop Icons
After2.jpg


Ninite - Auto Installs Freeware apps you select.

Ninite runs on Windows XP/Vista/7 and works
in the background 100% hands-free.

We install apps with default settings and
say "no" to browser toolbars and other junk.

All we do is install the latest versions of the apps
you choose. Not even Ninite is installed.


how it works?
How-To Geek
http://www.howtogeek...redibly-simple/

#2 sLiM

sLiM

    Member

  • Members
  • 52 posts
  •  
    United States

Posted 25 October 2009 - 01:07 AM

TheHive - "I wish it would download them and keep them in its own folder so you wouldnt have to redownload them anytime you need to install them. Seems like a bit of wasted bandwidth."

In Vista, Ninite created two temporary folders in c:\>document and settings>family (for me)>local settings>temp.
Their names consisted of many numbers and letters. Something like this --> oaiefjhsad8884e34fshff
The first one remains empty until the download is assembled into a file called "target.exe" and will remain only long enough to install itself. I believe the second one contained the file Ninite.exe. It also remained only long enough to complete the install.
After the install, both folders vanished.

I located these folders while Ninite was downloading and kept them open.
My firewall stopped the installation process while asking permission to install, so I was able to copy the assembled file (target.exe in my case) to my desktop. A closer inspection revealed the file to correctly be Songbird, with a size of 13 Mb, that appears to be the working installer that you speak of. :cheers:

Update: Free for a limited time Ninite Advanced Features
Doesn't work for me

#3 was_jaclaz

was_jaclaz

    Finder

  • Advanced user
  • 7101 posts
  • Location:Gone in the mist
  •  
    Italy

Posted 25 October 2009 - 08:48 AM

Isn't that what the "ninite cache" should be?:
http://ninite.com/info/advanced

Advanced Features
Local Caching

To enable local caching, simply create a folder called "NiniteCache" next to the installer. When you run the installer, it will automatically use the "NiniteCache" folder to store all downloaded data.

You can safely delete the NiniteCache folder when no longer needed.
Network Caching or Other Cache Locations

To specify a cache location such as a network share, create a file called "Ninite.ini" next to the installer.

The file has a simple format:
[Cache]
path=<your cache path goes here>


Sometimes reading the (one page) manual helps...:cheers:

What do you mean "it doesn't work"?

If I get it right, the "NiniteCache" should be in the same folder when you placed the installer.

But if using the nininte.ini, you should be able to use also a local path:
&#91;Cache&#93;

path=C&#58;\ninite\
or
&#91;Cache&#93;

path=C&#58;\ninite
:cheers:

;)

jaclaz

#4 sLiM

sLiM

    Member

  • Members
  • 52 posts
  •  
    United States

Posted 25 October 2009 - 02:35 PM

1) I agree. Reading the (one page) manual helps, which I have done and tested the local caching.
2) I said it doesn't work for me. And it doesn't. I followed the instructions for local caching exactly to the letter. The downloaded data was located in the NiniteCache folder. That's OK, but I could not get it to install anything. I receive and error message saying the installation could not be verified and I simply could not find where it had been. The other thing is that the "Advanced Features are to be free for a limited time" which to me, means that sooner or later you will have to buy these if you want the convenience of using them. So someone might be interested in using the "target.exe" file, which does work for me. :cheers:

#5 was_jaclaz

was_jaclaz

    Finder

  • Advanced user
  • 7101 posts
  • Location:Gone in the mist
  •  
    Italy

Posted 25 October 2009 - 03:55 PM

Yep, I was partly replying to TheHive (RTFM part) an partly to you (try the .ini file). :cheers:

I wouldn't normally touch an app that dowloads "by his own will" something (which could be "any" payload ;) without really, really trusting the maker), but out of curiosity I tried it.

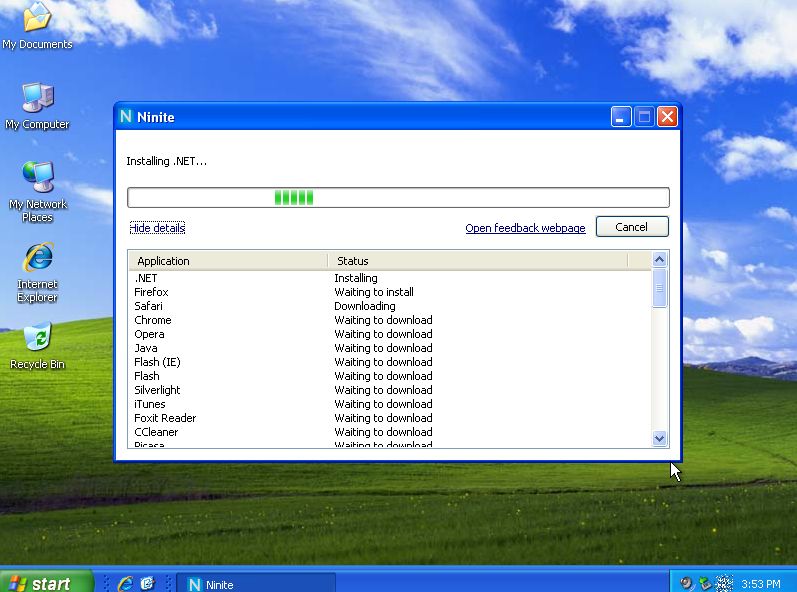
I used Recuva as it is a small enough app to quickly test.

I put the "Recuva Ninite Installer.exe" in a folder "C:\test_ninite"

I created in the same folder a sub-directory, naming it "NiniteCache" i.e.
Directory di C&#58;\test_ninite


25/10/2009  16.24	<DIR>		  .

25/10/2009  16.24	<DIR>		  ..

25/10/2009  16.25	<DIR>		  NiniteCache

25/10/2009  16.10		   169.160 Recuva Ninite Installer.exe

			   1 File		169.160 byte

It worked as expected, after the app finished I found in it a file named:

EA0A3E382F538A5BAD2E2A26FABEC2209E6880CA

which can be opened with 7zip allright, the contents are similar to those of most installer packages, at first sight.

Uninstalling Recuva and re-running "Recuva Ninite Installer.exe" results in a new installation without re-downloading the files (MUCH faster).

Then I added a "ninite.ini" file with these contents:
&#91;Cache&#93;

path=C&#58;\test_ninite\NiniteCache\Recuva\
and created a new directory "Recuva" inside the "NiniteCache".

The

C:\test_ninite\NiniteCache\EA0A3E382F538A5BAD2E2A26FABEC2209E6880CA

was used nonetheless.

Then I renamed "NiniteCache" to "NiniteMyCache" and edited accordingly the "ninite.ini":
&#91;Cache&#93;

path=C&#58;\test_ninite\NiniteMyCache\Recuva\
and re-ran "Recuva Ninite Installer.exe".

This time Recuva was re-downloaded and the resulting file "EA0A3E382F538A5BAD2E2A26FABEC2209E6880CA"
was inside the "C:\Downloaded\maanu\NiniteMyCache\Recuva\" folder.

Re-running "Recuva Ninite Installer.exe" results again in a "quick" install using local files.

So, though I would never use it in "real life", and I find it overall unneeded/unuseful, it seems like it delivers to me what it advertises.

:cheers:

jaclaz

#6 TheHive

TheHive

    Platinum Member

  • .script developer
  • 4199 posts

Posted 25 October 2009 - 03:58 PM

The cache folder thing seemed to work.
Ninite_1.jpg

The reinstalling using the same folder works.

1.jpg
2.jpg

Thanks for the tip. :cheers:


0 user(s) are reading this topic

0 members, 0 guests, 0 anonymous users