Before I begin with the guide, I'd like to mention that the information here has been gathered from these sources, and I give all the credit to them:
http://4sysops.com/a...e-tools-part-1/
http://stealthfield....e-4-0-boot-iso/
1. First you need a PC with Windows 7 (or higher) installed on it. You obviously need a flash drive, 4GB should be enough.
2. You'll also need to download the Windows ADK for Windows 8 from Microsoft, and install it (the actual download is 1.95GB).
3. We're going to make your flash drive bootable. Make sure it doesn't contain important files. Open CMD with admin rights, and type:
[ATTENTION: Replace ‘#’ with the DISK number of your flash drive as it appears after typing LIST DISK]
diskpart
list disk
select disk #
clean
create partition primary
select partition 1
active
format quick fs=fat32
assign
exit
Here's an example screenshot: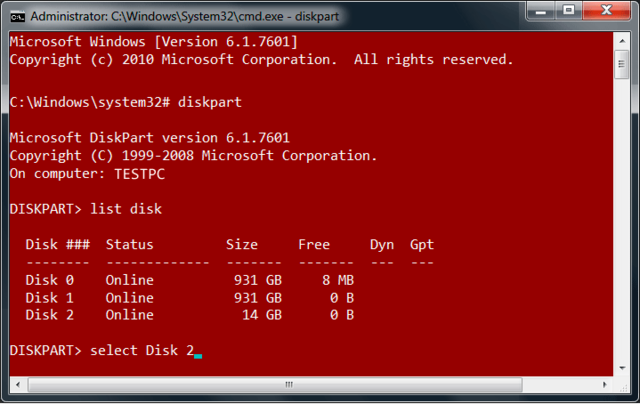
ATTENTION! If you're building a 64bit WinPE4.0, use amd64 instead of x86 in the following steps.
4. Go to: [ADK Install DIR]\Assessment and Deployment Kit\Windows Preinstallation Environment\x86\Media
5. Copy the entire "Media" folder to C:\Temp\PE4 (so now you should have C:\Temp\PE4\Media).
6. Copy [ADK Install DIR]\Assessment and Deployment Kit\Windows Preinstallation Environment\x86\en-us\winpe.wim into: C:\Temp\PE4\Media\Sources (create this new "Sources" folder).
7. Rename the file “winpe.wim” to “boot.wim“.
8. From the Start Menu -> All Programs -> ADK folder, open the Deployment Tools Command Prompt, and type:
cd C:\Temp\PE4
9. We now need to create a new folder which will act as a mount point for the WIM file, so type:
md C:\MOUNT
10. To mount the WIM file, type:
DISM /Mount-Wim /WimFile:Media\Sources\boot.wim /Index:1 /MountDir:C:\MOUNT
11. We are now going to modify the boot.wim file by adding some optional components.
The additional components can be found in the following folder:
[ADK INSTALL DIR]\Assessment and Deployment Kit\Windows Preinstallation Environment\x86\WinPE_OCs
Copy the "WinPE_OCs" folder to C:\Temp\PE4 (so now you should have C:\Temp\PE4\WinPE_OCs).
12. ATTENTION: After adding each component, you must also add its corresponding language file, otherwise the component you add won’t work!!
Adding a component takes a while, depending on its size. I recommend adding the following components by typing:
dism /image:C:\MOUNT /add-package /PackagePath:"C:\Temp\PE4\WinPE_OCs\WinPE-Scripting.cab"
dism /image:C:\MOUNT /add-package /PackagePath:"C:\Temp\PE4\WinPE_OCs\en-us\WinPE-Scripting_en-us.cab"

dism /image:C:\MOUNT /add-package /PackagePath:"C:\Temp\PE4\WinPE_OCs\WinPE-WMI.cab"
dism /image:C:\MOUNT /add-package /PackagePath:"C:\Temp\PE4\WinPE_OCs\en-us\WinPE-WMI_en-us.cab"

dism /image:C:\MOUNT /add-package /PackagePath:"C:\Temp\PE4\WinPE_OCs\WinPE-NetFx4.cab"
dism /image:C:\MOUNT /add-package /PackagePath:"C:\Temp\PE4\WinPE_OCs\en-us\WinPE-NetFx4_en-us.cab"

dism /image:C:\MOUNT /add-package /PackagePath:"C:\Temp\PE4\WinPE_OCs\WinPE-PowerShell3.cab"
dism /image:C:\MOUNT /add-package /PackagePath:"C:\Temp\PE4\WinPE_OCs\en-us\WinPE-PowerShell3_en-us.cab"

dism /image:C:\MOUNT /add-package /PackagePath:"C:\Temp\PE4\WinPE_OCs\WinPE-Dot3Svc.cab"
dism /image:C:\MOUNT /add-package /PackagePath:"C:\Temp\PE4\WinPE_OCs\en-us\WinPE-Dot3Svc_en-us.cab"
*You can put this code in a .bat file and run it to add all these packages in one go.
13. Now let's see how to add some drivers to your WinPE4.0.
ATTENTION: If you're building a 32bit WinPE - use 32bit drivers. For 64bit WinPE, use 64bit drivers!!
First, you'll need to extract the driver so that its CAT, SYS and INF files are accessible.
To add a (single) driver, type for example:
dism /image:C:\MOUNT /add-driver /driver:"C:\PathToDriver\drivername.inf"
DriverPacks are a good source for getting a lot of updated drivers in a single download (divided by categories).
For example, I added the LAN driver pack and the WLAN driver pack to my WinPE4.0.
ATTENTION: After downloading and extracting the driver packs, make sure to delete all the XP, Vista, NDIS5x, and NDIS61 folders, as they are not needed (WinPE4.0 is basically 6.2).
Also, I don't recommend adding the Chipset driver pack, as it contains drivers that might crash your WinPE4.0 on certain machines, and prevent it from booting normally.
Always test, test and test some more until your'e absolutely sure you have a good set of drivers.
You can add multiple drivers by typing:
dism /image:C:\MOUNT /add-driver /driver:[PATH TO DRIVERS] /Recurse /ForceUnsigned
This will take a while depending on the quantity and size of the drivers.
14. At this point, prior to committing your changes and unmounting the WIM file, you can copy certain portable standalone applications (such as Process Explorer, Ghost32, etc) into C:MOUNT so that they will reside inside the WIM file. However, I discourage you from doing so, as there's a better way, so bare with me.
15. Go into C:\MOUNT\Windows\System32 and open the file StartNet.cmd with Notepad (right-click on it and select "Edit").
16. By default, it only contains a single line (wpeinit). Replace its contents with the following, then save the file:
wpeinit
@echo off
for %%p in (a b c d e f g h i j k l m n o p q r s t u v w x y z) do if exist %%p:PStart set w=%%p
call %w%:PStart\PStart.exe
Basically, it's looking for a folder named PStart in the root of all of the drives. When it finds it, it will attempt to run Pstart.exe inside that folder.
NOTE for people building a 64bit WinPE4.0:
You should use some other launcher or file explorer. For example, here I want the WinPE4.0 to launch directly into Q-dir 64bit, located in the folder Qdir:
wpeinit
@echo off
for %%p in (a b c d e f g h i j k l m n o p q r s t u v w x y z) do if exist %%p:Qdir set w=%%p
call %w%:Qdir\Q-dir.exe
EDIT (as suggested by cdob): The code below does pretty much the same as above. I'm adding here this code which is based on Microsoft's own documentation. I've tried it, and it works just as well, so use one or the other:
wpeinit
@echo off
@color 1F
:: sets bg color to blue, and text to white

wpeutil.exe WaitForRemovableStorage
wpeutil.exe UpdateBootInfo

set PEBootRamdiskSourceDrive=
for /f "tokens=1-3 delims== " %%a in ('reg.exe query "HKLM\SYSTEM\CurrentControlSet\Control" /v "PEBootRamdiskSourceDrive" 2^>nul') do (
if %%a.==PEBootRamdiskSourceDrive. @set PEBootRamdiskSourceDrive=%%~dc
)
if Defined PEBootRamdiskSourceDrive (
echo PEBootRamdiskSourceDrive is %PEBootRamdiskSourceDrive%
)

@call %PEBootRamdiskSourceDrive%\QDir\Q-Dir.exe
17. ATTENTION: We are now going to commit our changes and unmount the WIM file. Close ALL file explorers, or the unmount process will give you an error!!
if you leave a Windows Explorer instance open, the unmounting process won't be able to cleanup the C:\MOUNT folder, and you'll see an error in the CMD window.
Type the following command:
DISM /Unmount-Wim /MountDir:C:\MOUNT /Commit
This process takes a while (a minute or so), so let it finish without interruption. When this process is finished, the C:\MOUNT folder will be empty.
18. Now copy the contents of the folder C:\Temp\PE4\Media to your flash drive. [EDITED 2012-03-21, thanks Wimb]
19. ATTENTION: This step is for WinPE 4.0 x86 ONLY. PSTART will not work on WinPE 4.0 x64, unless you manually add WoW64.
The WinPE4.0 flash drive is now bootable. However, since WinPE doesn’t have a GUI interface like a regular Windows, you have to launch your tools from the command prompt, which is too inconvenient.
That is why we're going to add PStart to the flash drive. PStart is a simple and free standalone menu which allows to start user-defined applications. Download PStart from here.
When you run the PStartSetup211.exe, choose "Portable Setup"->Select your flash drive -> Next -> Browse -> Make new folder ->type: PStart and click OK -> Install Now -> Finish.
Here's an example of my PStart menu: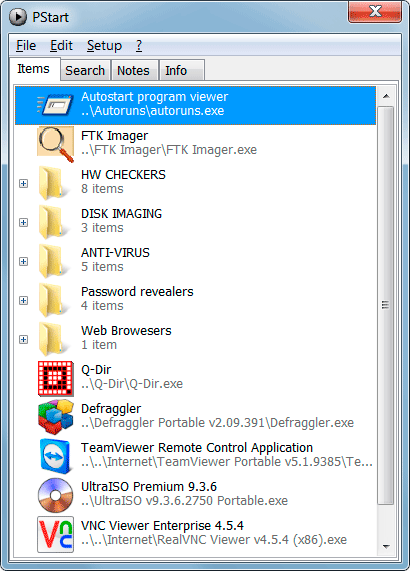
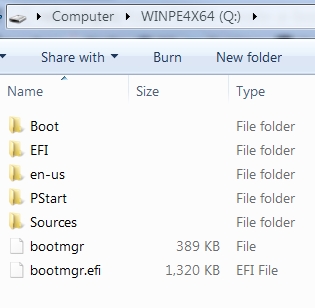
20. Just to remove any doubt, this is how the root of the flash drive should be at this moment (ignore the WINPEX64 name on top):
The boot.wim file should be in the Sources folder, and PStart.exe should be in the PStart folder.
21. Double-click the pstart.exe to open the menu (from the flash drive).
Copy any utilities or applications that you like to the flash drive, and drag-n-drop their executable to the PStart menu.
I highly recommend adding some sort of file explorer, for example: Q-Dir, Explorer++, XYplorer, etc.
22. Once you're done adding all your favorite apps, close PStart by clicking File->Exit Application (clicking on the X button doesn't close it!!).
23. Eject the flash drive, and boot from it by selecting it from the BIOS Boot Menu. Once it's done loading, PStart should appear and you can pretty much do anything from here on. The great thing about adding files through PSart is that whenever you want to add a new app or update an existing one, it's as simple as drag-n-drop. Simply connect your WinPE4.0 flash drive to your Windows machine, run PStart, and perform all the necessary changes.
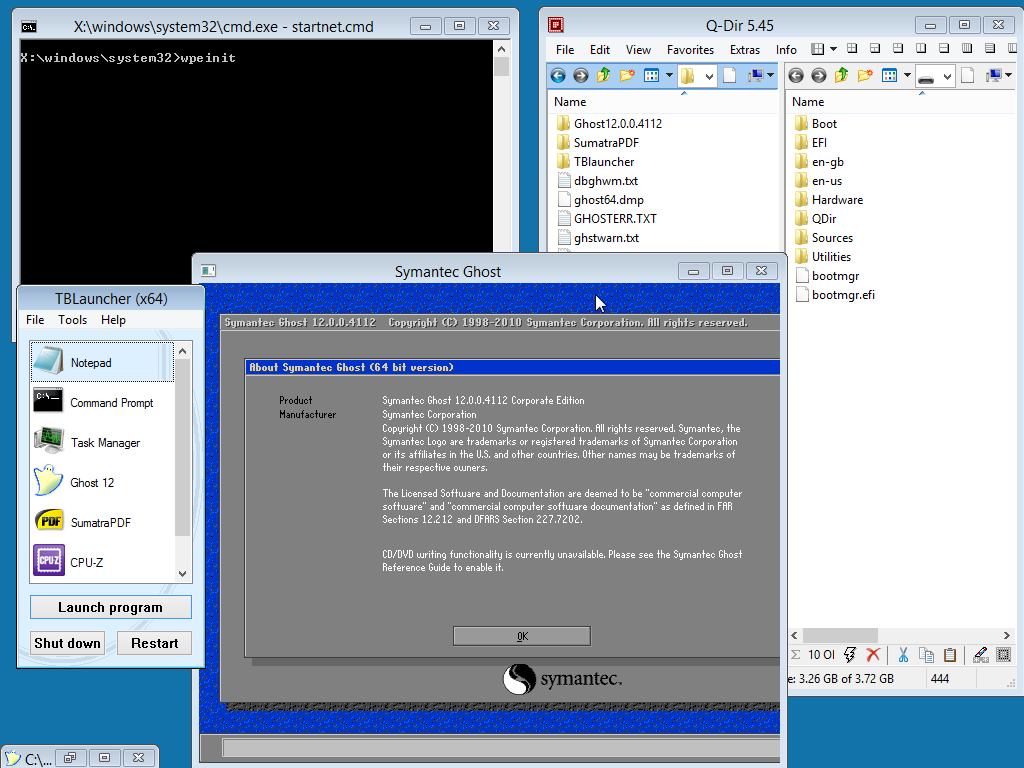
Here's a screenshot I took from one WinPE4.0 I've created:


 Unfortunately, there was no option to download only 32 or 64-bit WinPE from ADK package.


 .
.