Jump to content


Photo

Install XP from USB

tutorial

  • Please log in to reply
130 replies to this topic

#76 gchorn

gchorn

    Newbie

  • Members
  • 10 posts
  •  
    United States

Posted 30 January 2011 - 05:47 AM

If you don't see your HDD drive, it might be that you are missing MassStorage drivers.
Another cause can be wrong BIOS Setting.

Before Install Change your SATA BIOS Setting from AHCI into IDE Controller or Compatibility.


Hi, I'm sort of new to all of this, I've followed your instructions as closely as possible (they've been great!) but I'm having the same problem, only my flash drive is showing up at this step and when I go into BIOS options it doesn't let me change anything like what you describe above. I'm using an HP Mini 311-1000NR, if that helps at all...

If it is an issue of drivers rather than BIOS setting, how do I get said drivers and where do I put them so that they're ready at the beginning of the Windows XP txt setup? Many thanks for any help anyone can give!!!

#77 wimb

wimb

    Platinum Member

  • Developer
  • 3756 posts
  • Interests:Boot and Install from USB
  •  
    Netherlands

Posted 30 January 2011 - 06:24 AM

For installing XP on modern systems with SATA Drives it is needed to use DPsBase.exe
for Integrating in your XPSOURCE BTS DriverPack Massstorage with TXT Mode Enabled.
In that case a lot of Extra RAID SCSI and SATA Drivers (about 120 extra) are Integrated and will appear in the
XP Setup BootFolder $WIN_NT$.~BT on USB-Drive and can prevent a lot of XP Installation Boot Problems.
http://driverpacks.net/downloads - Get the latest

This enables TXT-mode of XP Setup to use MassStorage drivers of the DriverPack.

Succes.

;)

#78 gchorn

gchorn

    Newbie

  • Members
  • 10 posts
  •  
    United States

Posted 30 January 2011 - 06:06 PM

Hi, sorry like I said I'm new at this so I gave it my best shot but I think I missed a step (and probably one that was obvious to everyone else)--I downloaded the Mass Storage Driver Pack from the link above, extracted all of the contents directly into the $WIN_NT$.~BT folder on the USB drive, then plugged it into the netbook and tried to start the installation again, but once again only the USB drive showed up at the partition-creating step. So I tried again and then hit F6 where it asks if you want install any third party SCSI or RAID drivers (at the beginning of the TXT installation, right before it starts loading up all of the files from your USB drive), and I get the message:

"Setup could not determine the type of one or more mass storage devices installed in your system, or you have chosen to manually specify an adapter. Currently, Setup will load support for the following mass storage device(s): <none>"
So here I chose the option "S" for Specify Additional Device, and I end up with:

"Setup could not find a floppy drive on your machine to load OEM drivers from floppy disk."

Does this mean I extracted the Mass Storage Diver Pack to the wrong place? Or that I need an additional driver pack for floppy disks? Or did I select the wrong option in one of the previous steps? Sorry for the trouble, I just need somewhat specific instructions as my knowledge of a lot of this stuff is probably somewhat limited compared to most members on this forum. Thank you!!!

#79 Wonko the Sane

Wonko the Sane

    The Finder

  • Advanced user
  • 16066 posts
  • Location:The Outside of the Asylum (gate is closed)
  •  
    Italy

Posted 30 January 2011 - 06:21 PM

... extracted all of the contents directly into the $WIN_NT$.~BT folder on the USB drive ...


WHY? :loleverybody:

Go back one step and read the:
http://driverpacks.n...uide-windows-xp

;)
Wonko

#80 gchorn

gchorn

    Newbie

  • Members
  • 10 posts
  •  
    United States

Posted 31 January 2011 - 09:44 PM

Thanks for the link. Apparently I'm still doing something wrong, though.

Here's what I did--I read the article Wonko posted and tried to apply it to the procedure outlined at the top of this article (making a bootable XP-installing usb drive using Multiboot). So I ran DPs_BASE and at this step:

Now from the below screen you can select the Windows source directory we created earlier in step 1 (the directory that contains the I386 folder, NOT your C:\Windows\ directory) by pressing the "Browse" button. Select what type of Windows source you are using (typically select "disc" option unless you are using an advanced multiboot Win2k, WinXP, Win2k3 source or a BartPE environment). Then click the right arrow button again.


I chose the $WIN_NT$.~LS folder (since it had I386 in it) on my USB drive created earlier using Multiboot, and I chose the "disc" option. My guess is that I went wrong somewhere around here, but someone please let me know!

#81 ilko

ilko

    Silver Member

  • Advanced user
  • 500 posts
  •  
    Bulgaria

Posted 31 January 2011 - 10:24 PM

Integrate mass storage drivers to your source, where Windows CD/ISO was copied/extracted. Next prepare again the USB drive with the updated source.

#82 Wonko the Sane

Wonko the Sane

    The Finder

  • Advanced user
  • 16066 posts
  • Location:The Outside of the Asylum (gate is closed)
  •  
    Italy

Posted 01 February 2011 - 10:30 AM

I chose the $WIN_NT$.~LS folder (since it had I386 in it) on my USB drive created earlier using Multiboot, and I chose the "disc" option. My guess is that I went wrong somewhere around here, but someone please let me know!

Actually the given HOWTO is seemingly written in plain enough English. :thumbsup:

Step 1: Copy Windows CD to HDD
Step 2: install DriverPacks BASE
Step 3: download DriverPacks
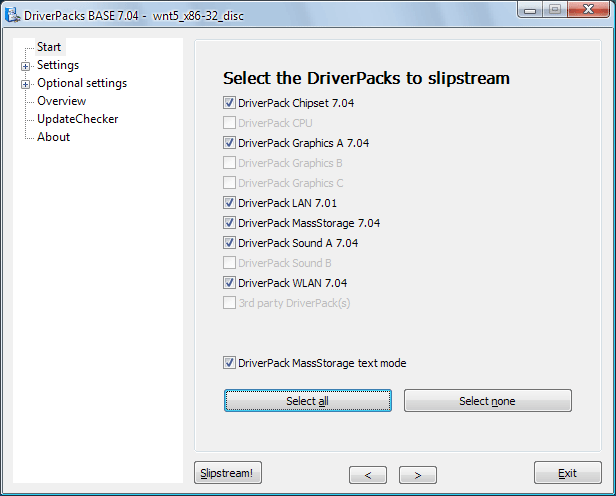
Step 4: using DriverPacks BASE
Step 5: DriverPacks BASE optional settings
Step 6: reviewing your settings
Step 7: the UpdateChecker
Step 8: slipstream!

....
If all went well, then build your Windows source into an ISO file ...
...


Maybe it's the general concept that was not clear.

The idea of the driverspack is to take a "CD" source (a "standard" XP install CD or it's .iso or the files in it copied to HD) as input and "transform" it in an output consisting in a bettered "CD" source by integrating to it more drivers.

The idea of the "Install from USB" programs is to take a "CD" source (which would theoretically work if burned to CD - or the actual CD - or it's .iso) as input and "transform" it in an output consisting in a USB bootable setup (USB source).

You don't modify the USB source - which is the FINAL RESULT, or if you prefer, in the originally linked page order of operations:

Caution

Once the DriverPacks are integrated into your Windows source, you will not be able to integrate any patches or hotfixes without breaking the DriverPacks. This means that you should run nLite and the RyanVM Integrator before DriverPacks BASE!
The recommended order is:

  • RyanVM Integrator
  • nLite
  • DriverPacks BASE


becomes:

The recommended order is:

  • RyanVM Integrator
  • nLite
  • DriverPacks BASE
  • Install XP from USB utilities


;)
Wonko

#83 gchorn

gchorn

    Newbie

  • Members
  • 10 posts
  •  
    United States

Posted 02 February 2011 - 02:07 AM

Haha, thank you Wonko and Ilko, I think I get it now. I appreciate you not giving up on me! Time to give this another shot...I'll let you know how it goes!

#84 gchorn

gchorn

    Newbie

  • Members
  • 10 posts
  •  
    United States

Posted 02 February 2011 - 06:11 AM

Yikes, somehow my hard drive is still not showing up. I copied the contents of the Windows XP CD directly into my C: drive, ran DPs_BASE to slipstream the Mass Storage Driver Pack to the folder in which I had copied the CD contents, ran USB_Multiboot.cmd to setup the USB drive, inserted into my HP Mini 311 and then turned it on (I had previously set it to boot from the USB drive in the BIOS), selected option 1 (TXT installation), hit "F6" on the next page, got the

"Currently, Setup will load support for the following mass storage devices: <none>, to specify additional adapters hit 'S'"

message, so I hit "S", then I get "Setup could not find a floppy drive on your machine to load OEM drives from floppy disk."

Does this point to something else I could be doing something wrong? Or is it more likely I'm still screwing up the slipstreaming or USB_Multiboot steps?

#85 ilko

ilko

    Silver Member

  • Advanced user
  • 500 posts
  •  
    Bulgaria

Posted 02 February 2011 - 07:35 AM

There is no need to press F6, drivers are already integrated in your source if you used BP Base properly, just as "stock" drivers are.

Did you select DriverPack MassStorage TextMode in DP Base?
http://driverpacks.n...ges/DPBase7.png

If no- redo the whole procedure.
If yes- did you try to launch Setup without hitting F6 etc.?

#86 gchorn

gchorn

    Newbie

  • Members
  • 10 posts
  •  
    United States

Posted 04 February 2011 - 05:36 AM

I did...should I choose slipstream method 1 or 2 in the next step?

#87 ilko

ilko

    Silver Member

  • Advanced user
  • 500 posts
  •  
    Bulgaria

Posted 04 February 2011 - 06:38 AM

Leave it default, 2.

#88 gchorn

gchorn

    Newbie

  • Members
  • 10 posts
  •  
    United States

Posted 05 February 2011 - 05:50 AM

Thank all of you guys again for your continued help.

So I found a different thread in the HP forums that was specifically about the Mini-311 hard drive issue. As it turns out, I think I had the wrong drivers; I specifically needed the Nvidia ION platform SATA drivers. Anyway, once I slipstreamed these to my source and then loaded that onto my USB drive and tried again, Windows Setup was finally able to see my C: drive again--yes!!!


But then I ran into a new problem. A ways into the setup process, the following message popped up:

"The following value in the .SIF file used by Setup is corrupted or missing:

Value 0 on the line in section [SourceDisksFiles] with key 'SP3.cab.'

Setup cannot continue. To quit Setup, press F3."


What's going on here? I thought maybe I needed to edit the TXTSETUP.SIF file, but when I looked for sp3.cab, I couldn't find it. So now I'm wondering if this means Setup is looking for Service Pack 3, which isn't in there? Do I need to go back and slipstream that into my source??

#89 gchorn

gchorn

    Newbie

  • Members
  • 10 posts
  •  
    United States

Posted 05 February 2011 - 11:00 PM

Update: I went ahead and used nLite to slipstream both SP3 and the Nvidia SATA IDE drivers to a fresh copy of the XP Source, then made a new USB stick from it and fired up my HP Mini with the USB stick plugged in. This was the first thing that popped up:

Windows could not start because the following file is missing or corrupt:
<Windows root>\system32\hal.dll.
Please re-install a copy of the above file.


I thought this error was only supposed to happen after TXT Mode Setup completed, during the GUI portion? Any ideas?

#90 bomz

bomz

    Member

  • Members
  • 93 posts

Posted 06 February 2011 - 12:24 AM

Native method with WINNT of WINNT32 not satisfied you?

#91 ilko

ilko

    Silver Member

  • Advanced user
  • 500 posts
  •  
    Bulgaria

Posted 06 February 2011 - 04:10 AM

Update: I went ahead and used nLite to slipstream both SP3 and the Nvidia SATA IDE drivers to a fresh copy of the XP Source, then made a new USB stick from it and fired up my HP Mini with the USB stick plugged in. This was the first thing that popped up:


I thought this error was only supposed to happen after TXT Mode Setup completed, during the GUI portion? Any ideas?

You either didn't boot from USB, or the USB stick was not prepared properly, or you booted from the wrong entry in boot.ini.
The message is from NTLDR, translated means "in the ARC path in boot.ini to the windows directory I couldn't find \system32\hal.dll, but the disk/partition combination exists.

#92 gchorn

gchorn

    Newbie

  • Members
  • 10 posts
  •  
    United States

Posted 07 February 2011 - 03:22 AM

I finally figured out a way. It was ugly, but it worked. On my last failed attempt to install XP, I had deleted Windows before once again hitting a wall, so at that point I had no OS on my netbook. So I installed Ubuntu on it, in the process wiping the hard drive entirely.

Then I went back and started over. Copied my XP source to a folder on my C: drive, slipstreamed the Nvidia SATA IDE drivers to it using Nlite, then used USB_Multiboot.cmd to create my bootable USB stick with XP on it. This time, it finally worked, no hall.dll error or anything. YES!!!!

However, I've noticed that now, when I reboot the computer, I have two booting options:

Microsoft Windows XP Professional
USB Repair NOT to Start Microsoft Windows XP Professional

How do I get rid of the second option so that it just automatically boots to Windows?

Also, I'm being asked to "Activate Windows," but neither the CD Key that came with the HP Mini or the one that pops up during the USB_Multiboot.cmd process (which I assume is extracted from my Source) are working for this. Anyone know why?

#93 Wonko the Sane

Wonko the Sane

    The Finder

  • Advanced user
  • 16066 posts
  • Location:The Outside of the Asylum (gate is closed)
  •  
    Italy

Posted 07 February 2011 - 08:53 AM

However, I've noticed that now, when I reboot the computer, I have two booting options:

Microsoft Windows XP Professional
USB Repair NOT to Start Microsoft Windows XP Professional

Remove corresponding line from BOOT.INI in root of your first, active, primary partition (normally C:\).
It may be hidden, System and Read Only.
Change it's attributes, edit with Notepad.

:dubbio:
Wonko

#94 steve6375

steve6375

    Platinum Member

  • Developer
  • 7566 posts
  • Location:UK
  • Interests:computers, programming (masm,vb6,C,vbs), photography,TV,films
  •  
    United Kingdom

Posted 07 February 2011 - 09:27 AM

For activation, you need to copy the oembios.* files from the original HP CD (usually /i386 folder ??) to your C:\windows\system32 folder. Also you need to use the OEM Product Key (not the one on the COA label which is useless). You may find this in the original image CD in the unattend.txt file in the i386 folder, or maybe in the sysprep.inf file in C:\sysprep. Or maybe ask a friend to run Produkey.exe and tell you what the product key is on their HP Mini system (or try Google). If you cannot find it, let me know as I may be able to find it and can PM you.

#95 gchorn

gchorn

    Newbie

  • Members
  • 10 posts
  •  
    United States

Posted 07 February 2011 - 04:41 PM

Remove corresponding line from BOOT.INI in root of your first, active, primary partition (normally C:\).
It may be hidden, System and Read Only.
Change it's attributes, edit with Notepad.

:cheers:
Wonko


Thanks Wonko, this worked perfectly!

#96 thinman

thinman
  • Members
  • 1 posts
  •  
    Philippines

Posted 09 March 2011 - 06:50 PM

what seems to be the problem? after pressing 1.Begin txtmodesetup i get this message, "remove disk or other media.Press any key to restart". After pressing any key, it says, searching for boot record from ide-0...ok and nothing happens. anyone encountered the same problem i have?? pls help.

Some info that might help you figure out my problem:
first boot device is USB FDD-RMD, the rest i disabled
i used a SONY storage media 4gb formatted as FAT using the hp format tool
im trying to run it on a ECS A530 TM-5800 laptop

Edited by thinman, 09 March 2011 - 07:26 PM.


#97 Wh1t3c0d3r

Wh1t3c0d3r

    Member

  • Tutorial Writer
  • 80 posts
  • Location:/usr/bin/php
  • Interests:I'm an enthusiast PHP programmer working as an IT technician (level 2) for a small company that create software.
    I love to help and teach things to people for free (if possible)
  •  
    Canada

Posted 31 March 2011 - 04:53 PM

Hello,

I have a problem with the program: When I select my USB key for usb target it say the following: " ***** L: has NOT FAT FAT32 or NTFS Format and is NOT Valid ***** ". I have tried with another key (H was the drive letter) and it not work. I tried FAT32 and NTFS with the tool inside the program but not work when selecting target.

What is the problem?

Thanks in advance.

gael043

#98 wimb

wimb

    Platinum Member

  • Developer
  • 3756 posts
  • Interests:Boot and Install from USB
  •  
    Netherlands

Posted 31 March 2011 - 05:20 PM

In Vista or Win 7 you need to set User Account Control Off


:cheers:

#99 sara - pmedia

sara - pmedia

    Frequent Member

  • Lady
  • 184 posts
  • Location:tel aviv
  •  
    Israel

Posted 31 March 2011 - 05:42 PM

I have a problem with the program: When I select my USB key for usb target it say the following: " ***** L: has NOT FAT FAT32 or NTFS Format and is NOT Valid ***** ". I have tried with another key (H was the drive letter) and it not work. I tried FAT32 and NTFS with the tool inside the program but not work when selecting target.

What is the problem?


In Vista or Win 7 you need to set User Account Control Off


When I use wimb tool having the same error ... User Account Control was already considerable

any case I would recommend this tool for this purpose

#100 Wh1t3c0d3r

Wh1t3c0d3r

    Member

  • Tutorial Writer
  • 80 posts
  • Location:/usr/bin/php
  • Interests:I'm an enthusiast PHP programmer working as an IT technician (level 2) for a small company that create software.
    I love to help and teach things to people for free (if possible)
  •  
    Canada

Posted 31 March 2011 - 05:48 PM

I am using Windows 7 Ultimate. User control is OFF (Too much problem when active).


Also tagged with one or more of these keywords: tutorial

0 user(s) are reading this topic

0 members, 0 guests, 0 anonymous users