I) Preparing the Intel UHD video driver
A) Make sure you have another computer where you can use a Windows 7 installation or a virtual machine with Windows 7 x86 of x64 with .NET Framework at least version 4.0 installed (you can install latest version to be sure), remember that on a virtual machine x86 installs faster and works also faster. Also make sure you have an internet connection on this Windows 7 installation.
 Modify Intel HD video driver to work with Intel UHD video cards
1) Go to "Device Manager" under the installed Windows 10 or 8/8.1 on the target machine, look under "Display adapters", double-click on your "Intel UHD" device, go to "Details" and under "Property" select "Hardware Ids" and look vor "DEV_XXXX", where "XXXX" are the specific numbers for the device you have (for "Intel UHD 620" this is "DEV_5917"). Note down these numbers.
2) Download the Intel HD graphics driver version 21.20.16.4839 from here: https://www.station-...id=3256&lang=enand extract the contents.
3) Go to the extracted files, enter folder "Graphics" and delete the "igdlh.cat" catalog file.
4) Open "igdlh64.inf" with "Notepad" and search for the following path:
;=====================================================================
; Windows 7 Install - DT Only
;=====================================================================
[IntelGfx.NTamd64.6.1]
; SKL HW
%iSKLULTGT1% = iSKLD_w7, PCI\VEN_8086&DEV_1906
%iSKLULTGT2% = iSKLD_w7, PCI\VEN_8086&DEV_1916
%iSKLULXGT2% = iSKLD_w7, PCI\VEN_8086&DEV_191E
%iSKLDTGT2% = iSKLD_w7, PCI\VEN_8086&DEV_1912
%iSKLULTGT2f% = iSKLD_w7, PCI\VEN_8086&DEV_1921
%iSKLULTGT3e% = iSKLD_w7, PCI\VEN_8086&DEV_1926
%iSKLULTGT3% = iSKLD_w7, PCI\VEN_8086&DEV_1923
%iSKLULTGT328W% = iSKLD_w7, PCI\VEN_8086&DEV_1927
%iSKLDTGT1% = iSKLD_w7, PCI\VEN_8086&DEV_1902
%iSKLHaloGT1% = iSKLD_w7, PCI\VEN_8086&DEV_190B
%iSKLHaloGT4% = iSKLD_w7, PCI\VEN_8086&DEV_193B
%iSKLHaloGT3fe% = iSKLD_w7, PCI\VEN_8086&DEV_192B
%iSKLHaloGT2% = iSKLD_w7, PCI\VEN_8086&DEV_191B
%iSKLSRVGT3e% = iSKLD_w7, PCI\VEN_8086&DEV_192D
%iSKLSRVGT4% = iSKLD_w7, PCI\VEN_8086&DEV_193A
%iSKLWSGT2% = iSKLD_w7, PCI\VEN_8086&DEV_191D
%iSKLWSGT4% = iSKLD_w7, PCI\VEN_8086&DEV_193D
Add one more line by pressing enter at the end of this line "%iSKLWSGT4% = iSKLD_w7, PCI\VEN_8086&DEV_193D" and paste this (Note: this is for Intel UHD 620 graphic card which has "DEV_5917", if you have another video card, just use the "DEV_XXXX" that corresponds to you card, which you noted down earlier):
%iKBLULTGT2R% = iSKLD_w7, PCI\VEN_8086&DEV_5917
The section should look like this:
;=====================================================================
; Windows 7 Install - DT Only
;=====================================================================
[IntelGfx.NTamd64.6.1]
; SKL HW
%iSKLULTGT1% = iSKLD_w7, PCI\VEN_8086&DEV_1906
%iSKLULTGT2% = iSKLD_w7, PCI\VEN_8086&DEV_1916
%iSKLULXGT2% = iSKLD_w7, PCI\VEN_8086&DEV_191E
%iSKLDTGT2% = iSKLD_w7, PCI\VEN_8086&DEV_1912
%iSKLULTGT2f% = iSKLD_w7, PCI\VEN_8086&DEV_1921
%iSKLULTGT3e% = iSKLD_w7, PCI\VEN_8086&DEV_1926
%iSKLULTGT3% = iSKLD_w7, PCI\VEN_8086&DEV_1923
%iSKLULTGT328W% = iSKLD_w7, PCI\VEN_8086&DEV_1927
%iSKLDTGT1% = iSKLD_w7, PCI\VEN_8086&DEV_1902
%iSKLHaloGT1% = iSKLD_w7, PCI\VEN_8086&DEV_190B
%iSKLHaloGT4% = iSKLD_w7, PCI\VEN_8086&DEV_193B
%iSKLHaloGT3fe% = iSKLD_w7, PCI\VEN_8086&DEV_192B
%iSKLHaloGT2% = iSKLD_w7, PCI\VEN_8086&DEV_191B
%iSKLSRVGT3e% = iSKLD_w7, PCI\VEN_8086&DEV_192D
%iSKLSRVGT4% = iSKLD_w7, PCI\VEN_8086&DEV_193A
%iSKLWSGT2% = iSKLD_w7, PCI\VEN_8086&DEV_191D
%iSKLWSGT4% = iSKLD_w7, PCI\VEN_8086&DEV_193D
%iKBLULTGT2R% = iSKLD_w7, PCI\VEN_8086&DEV_5917
6) Then search for the following path:
HKLM, Software\Wow6432Node\Intel\MediaSDK\Dispatch\iKBL_5916, DeviceID, %REG_DWORD%, 0x5916
HKLM, Software\Wow6432Node\Intel\MediaSDK\Dispatch\iKBL_5916, VendorID, %REG_DWORD%, 0x8086
HKLM, Software\Wow6432Node\Intel\MediaSDK\Dispatch\iKBL_5916, APIVersion, %REG_DWORD%, 0x108
HKLM, Software\Wow6432Node\Intel\MediaSDK\Dispatch\iKBL_5916, Merit,%REG_DWORD%, 0x08000015
HKLM, Software\Wow6432Node\Intel\MediaSDK\Dispatch\iKBL_5916, Path, %REG_SZ%, "%16422%\Intel\Media SDK\libmfxhw32.dll"
and add this afterwards (Note: this is for Intel UHD 620 graphic card which has "0x5917", if you have another video card, just use the "0xXXXX" that corresponds to you card, where "XXXX" are the numbers from the "DEV_XXXX" which you noted down earlier):
HKLM, Software\Wow6432Node\Intel\MediaSDK\Dispatch\iKBL_5917, DeviceID, %REG_DWORD%, 0x5917
HKLM, Software\Wow6432Node\Intel\MediaSDK\Dispatch\iKBL_5917, VendorID, %REG_DWORD%, 0x8086
HKLM, Software\Wow6432Node\Intel\MediaSDK\Dispatch\iKBL_5917, APIVersion, %REG_DWORD%, 0x108
HKLM, Software\Wow6432Node\Intel\MediaSDK\Dispatch\iKBL_5917, Merit,%REG_DWORD%, 0x08000015
HKLM, Software\Wow6432Node\Intel\MediaSDK\Dispatch\iKBL_5917, Path, %REG_SZ%, "%16422%\Intel\Media SDK\libmfxhw32.dll"
The section should look like this:
HKLM, Software\Wow6432Node\Intel\MediaSDK\Dispatch\iKBL_5916, DeviceID, %REG_DWORD%, 0x5916
HKLM, Software\Wow6432Node\Intel\MediaSDK\Dispatch\iKBL_5916, VendorID, %REG_DWORD%, 0x8086
HKLM, Software\Wow6432Node\Intel\MediaSDK\Dispatch\iKBL_5916, APIVersion, %REG_DWORD%, 0x108
HKLM, Software\Wow6432Node\Intel\MediaSDK\Dispatch\iKBL_5916, Merit,%REG_DWORD%, 0x08000015
HKLM, Software\Wow6432Node\Intel\MediaSDK\Dispatch\iKBL_5916, Path, %REG_SZ%, "%16422%\Intel\Media SDK\libmfxhw32.dll"
HKLM, Software\Wow6432Node\Intel\MediaSDK\Dispatch\iKBL_5917, DeviceID, %REG_DWORD%, 0x5917
HKLM, Software\Wow6432Node\Intel\MediaSDK\Dispatch\iKBL_5917, VendorID, %REG_DWORD%, 0x8086
HKLM, Software\Wow6432Node\Intel\MediaSDK\Dispatch\iKBL_5917, APIVersion, %REG_DWORD%, 0x108
HKLM, Software\Wow6432Node\Intel\MediaSDK\Dispatch\iKBL_5917, Merit,%REG_DWORD%, 0x08000015
HKLM, Software\Wow6432Node\Intel\MediaSDK\Dispatch\iKBL_5917, Path, %REG_SZ%, "%16422%\Intel\Media SDK\libmfxhw32.dll"
7) Then search for the following path:
HKLM, Software\Intel\MediaSDK\Dispatch\iKBL_5916, DeviceID, %REG_DWORD%, 0x5916
HKLM, Software\Intel\MediaSDK\Dispatch\iKBL_5916, VendorID, %REG_DWORD%, 0x8086
HKLM, Software\Intel\MediaSDK\Dispatch\iKBL_5916, APIVersion, %REG_DWORD%, 0x108
HKLM, Software\Intel\MediaSDK\Dispatch\iKBL_5916, Merit,%REG_DWORD%, 0x08000015
HKLM, Software\Intel\MediaSDK\Dispatch\iKBL_5916, Path, %REG_SZ%, "%16422%\Intel\Media SDK\libmfxhw64.dll"
and add this afterwards (Note: this is for Intel UHD 620 graphic card which has "0x5917", if you have another video card, just use the "0xXXXX" that corresponds to you card, where "XXXX" are the numbers from the "DEV_XXXX" which you noted down earlier):
HKLM, Software\Intel\MediaSDK\Dispatch\iKBL_5917, DeviceID, %REG_DWORD%, 0x5917
HKLM, Software\Intel\MediaSDK\Dispatch\iKBL_5917, VendorID, %REG_DWORD%, 0x8086
HKLM, Software\Intel\MediaSDK\Dispatch\iKBL_5917, APIVersion, %REG_DWORD%, 0x108
HKLM, Software\Intel\MediaSDK\Dispatch\iKBL_5917, Merit,%REG_DWORD%, 0x08000015
HKLM, Software\Intel\MediaSDK\Dispatch\iKBL_5917, Path, %REG_SZ%, "%16422%\Intel\Media SDK\libmfxhw64.dll"
The section should look like this:
HKLM, Software\Intel\MediaSDK\Dispatch\iKBL_5916, DeviceID, %REG_DWORD%, 0x5916
HKLM, Software\Intel\MediaSDK\Dispatch\iKBL_5916, VendorID, %REG_DWORD%, 0x8086
HKLM, Software\Intel\MediaSDK\Dispatch\iKBL_5916, APIVersion, %REG_DWORD%, 0x108
HKLM, Software\Intel\MediaSDK\Dispatch\iKBL_5916, Merit,%REG_DWORD%, 0x08000015
HKLM, Software\Intel\MediaSDK\Dispatch\iKBL_5916, Path, %REG_SZ%, "%16422%\Intel\Media SDK\libmfxhw64.dll"
HKLM, Software\Intel\MediaSDK\Dispatch\iKBL_5917, DeviceID, %REG_DWORD%, 0x5917
HKLM, Software\Intel\MediaSDK\Dispatch\iKBL_5917, VendorID, %REG_DWORD%, 0x8086
HKLM, Software\Intel\MediaSDK\Dispatch\iKBL_5917, APIVersion, %REG_DWORD%, 0x108
HKLM, Software\Intel\MediaSDK\Dispatch\iKBL_5917, Merit,%REG_DWORD%, 0x08000015
HKLM, Software\Intel\MediaSDK\Dispatch\iKBL_5917, Path, %REG_SZ%, "%16422%\Intel\Media SDK\libmfxhw64.dll"
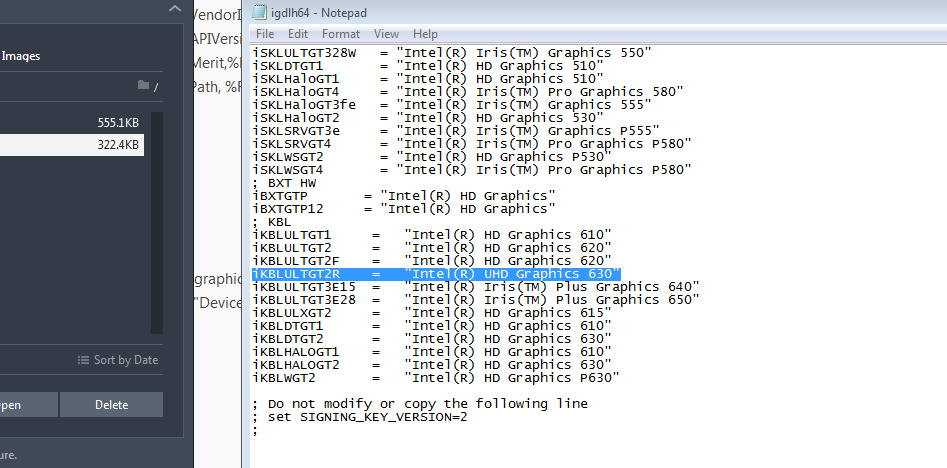
8) Then search for the following path:
; KBL
iKBLULTGT1 = "Intel® HD Graphics 610"
iKBLULTGT2 = "Intel® HD Graphics 620"
iKBLULTGT2F = "Intel® HD Graphics 620"
and add this afterwards (Note: this is for Intel UHD 620 graphic card which has "Intel® UHD Graphics 620" as a name, if you have another video card, just use the name you have in "Device manager", where you looked earlier):
iKBLULTGT2R = "Intel® UHD Graphics 620"
The section should look like this:
; KBL
iKBLULTGT1 = "Intel® HD Graphics 610"
iKBLULTGT2 = "Intel® HD Graphics 620"
iKBLULTGT2F = "Intel® HD Graphics 620"
iKBLULTGT2R = "Intel® UHD Graphics 620"
9) Save the changes to "igdlh64.inf" file.
10) Download "HxD Hex Editor" from here https://mh-nexus.de/...loads/HxDen.zip, extract the archive and run the program.
11) Open "igdumdim32.dll", go to "Search" -> "Replace", add this "83 F8 13 75 43 F7 42 04 00 00 00 02 74 3A" without the quotes to the "Search for" field and "83 F8 13 75 43 F7 42 04 00 00 00 02 90 90" without the quotes to the "Replace with" field, select "Datatype" as "Hex-values", select "Search direction" as "All" and click "Replace all", then save the changes.
12) Open "igdumdim64.dll" go to "Search" -> "Replace", add this "01 76 17 83 F9 13 75 44 F7 42 04 00 00 00 02 74 3B" without the quotes to the "Search for" field and "01 76 17 83 F9 13 75 44 F7 42 04 00 00 00 02 90 90" without the quotes to the "Replace with" field, select "Datatype" as "Hex-values", select "Search direction" as "All" and click "Replace all", then save the changes.
C) Sign the modified Intel UHD video driver:
1) Download Windows Driver Kit Version 7.1.0 from here: https://download.mic...K_EN_7600_1.ISO(works for both x86 and x64 version of Windows 7) and install it.
2) Download Microsoft Windows SDK from here: https://download.mic...MSDK_EN_DVD.iso(x86) or https://download.mic...SDKX_EN_DVD.iso (x64) and install it.
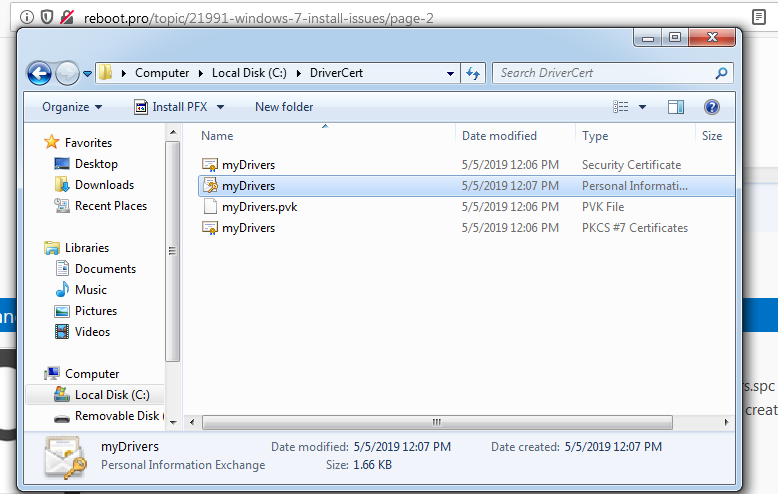
3) Create a folder named "DriverCert" in the "C:\" drive of your computer with running Windows 7. Inside that folder, create a folder named "Intel". You would obtain the following path "C:\DriverCert\Intel".
4) Copy the "Graphics" folder from the Intel UHD modified driver you modified earlier to the following path "C:\DriverCert\Intel", so that you obtain the following path "C:\DriverCert\Intel\Graphics".
5) Create a certificate using the following commands entered line by line in an elevated (Run as administrator) "Command prompt" window, when asked input "12345" (twice) as password:
a) for Windows 7 x86:
cd C:\Program Files\Microsoft SDKs\Windows\v7.1\bin
makecert -r -sv C:\DriverCert\myDrivers.pvk -n CN="Intel" C:\DriverCert\myDrivers.cer
cert2spc C:\DriverCert\myDrivers.cer C:\DriverCert\myDrivers.spc
pvk2pfx -pvk C:\DriverCert\myDrivers.pvk -pi 12345 -spc C:\DriverCert\myDrivers.spc -pfx C:\DriverCert\myDrivers.pfx -po 12345
for Windows 7 x64:
cd C:\Program Files (x86)\Microsoft SDKs\Windows\v7.1\bin
makecert -r -sv C:\DriverCert\myDrivers.pvk -n CN="Intel" C:\DriverCert\myDrivers.cer
cert2spc C:\DriverCert\myDrivers.cer C:\DriverCert\myDrivers.spc
pvk2pfx -pvk C:\DriverCert\myDrivers.pvk -pi 12345 -spc C:\DriverCert\myDrivers.spc -pfx C:\DriverCert\myDrivers.pfx -po 12345
6) Create a catalog file for the Intel UHD modified driver, using the following commands entered line by line in an elevated (Run as administrator) "Command prompt" window:
cd C:\WinDDK\7600.16385.1\bin\selfsign
inf2cat.exe /driver:"C:\DriverCert\Intel\Graphics" /os:7_X64 /verbose
7) Sign the Intel UHD modified driver using the earlier created certificate, using the following commands entered line by line in an elevated (Run as administrator) "Command prompt" window:
a) for Windows 7 x86:
cd C:\Program Files\Microsoft SDKs\Windows\v7.1\Bin
signtool sign /f C:\DriverCert\myDrivers.pfx /p 12345 /t http://timestamp.ver...ts/timstamp.dll/v C:\DriverCert\Intel\Graphics\igdlh.cat
for Windows 7 x64:
cd C:\Program Files (x86)\Microsoft SDKs\Windows\v7.1\Bin
signtool sign /f C:\DriverCert\myDrivers.pfx /p 12345 /t http://timestamp.ver...ts/timstamp.dll/v C:\DriverCert\Intel\Graphics\igdlh.cat
8) Copy the "Intel" folder containing the signed Intel UHD modified driver from "C:\DriverCert" on a second USB stick/external HDD/secondary HDD on the target computer.
D) Add the earlier created certificate on the Windows 7 installation so you can extract it afterwards from the registry.
1) In Start Menu, search for "mmc.exe", run it, go to "File" -> "Add/remove snap-ins", on the left column select "Certificates", then click "Add >", select "Computer account" and click "Next >", leave "Local computer" as selected, click "Next >", then "OK".
2) Then go to "Console Root" -> "Certificates (Local computer)", then right-click on "Trusted Publishers" and go to "All tasks" -> "Import". Then when you have to choose the certificate path, just browse to "C:\DriverCert" and choose "myDrivers.cer" file, then leave the selected "Place all certificates in the following store - Trusted Publishers" then choose "Finish".
3) Then go to "Console Root" -> "Certificates (Local computer)" -> "Trusted Publishers", you should see there on the right column your certificate named "Intel". Double-click on it and go to "Details", then look for "Thumbprint" and leave that open.\
E) Extract the certificate from registry and create the necessary files for the installation.
1) In Start Menu, search for "regedit.exe", run it, then go to "HKEY_LOCAL_MACHINE\SOFTWARE\Microsoft\SystemCertificates\TrustedPublisher\Certificates" and there you should find a key (looks like a folder on the left column) which has the exact numbers and letters as the thumbprint from earlier.
2) Now right-click that key (folder) and choose export, save the .reg file as "Cert1.reg".
3) Edit the "Cert1.reg" file and replace the following path "HKEY_LOCAL_MACHINE\SOFTWARE" with "HKEY_LOCAL_MACHINE\loaded_SOFTWARE" and save it. Make a duplicate (copy) of this "Cert1.reg" file and name it "Cert2.reg". Edit "Cert2.reg" file and replace the following path "SystemCertificates\TrustedPublisher" with "SystemCertificates\ROOT" and save the file
4) Copy these "Cert1.reg" and "Cert2.reg" files on a second USB stick/external HDD/secondary HDD on the target computer.
II) Preparing the Windows 7 installation files on a second USB stick/external HDD/secondary HDD on the target computer
A) Verify that you have copied the earlier modified and signed Intel UHD driver and the 2 registry files of the certificate to the second USB stick/external HDD/secondary HDD on the target computer. If you didn't, do that now.
Extract the Windows 7 x64 "install.wim" from any Windows 7 x64 ISO of your choice.
1) Use any ISO file viewer and open any Windows 7 x64 ISO of your choice.
2) Extract "install.wim" from the "sources" folder within the ISO file to the second USB stick/external HDD/secondary HDD on the target computer.
C) Download "Unlocker" application from here: https://softpedia-se...ocker 1.9.2.msiand copy it to the second USB stick/external HDD/secondary HDD on the target computer.
D) Copy the "bootmgfw.efi" to the second USB stick/external HDD/secondary HDD on the target computer.
1) If you have access to a Windows 10 installation, you find the file here "C:\Windows\Boot\EFI\bootmgfw.efi".
2) If you don't have access to a Windows 10 installation, you have to extract "sources\install.wim" from the ISO image of any Windows 10 installation kit, then open the "install.wim" with 7-Zip and you will find the file here: "\1\Windows\Boot\EFI\bootmgfw.efi".
III) Preparing the bootable Mini Windows 10 UEFI USB.
A) For this, you need an USB stick that will get formated to GPT format (you will lose all current data on it) so that it will boot on UEFI.
Download "Medicat Mini Windows 10 NAKED" ISO from here: https://drive.google...mNOF8pe6na/view
C) Download "ISO2Disc" application from here: https://softpedia-se...O2DiscSetup.exeand install it.
D) Insert the USB stick, check which drive letter it gets, then run "ISO2Disc", browse for the "Medicat Mini Windows 10 NAKED" ISO file, then select "Burn fo USB Flash Drive", verify that the correct drive letter of the USB stick and the size is correctly chosen, if not, choose the correct USB, then select "Partition Style" as "GPT" and click "Start Burn".
IV) Installing Windows 7 x64 procedure on the target computer
A) Boot the target computer from the created bootable Mini Windows 10 UEFI USB.
Partition the install HDD/SSD using diskpart from an elevated (run as administrator) "Command Prompt" window, remember to backup all data first, this will delete everything, using the following commands (where N is your choice for the install HDD/SSD, be careful when choosing):
list disk
select disk N
clean
convert gpt
create partition efi size=100
format quick fs=fat32
assign letter="S"
create partition primary
format quick fs=ntfs
assign letter="W"
exit
C) Let's assume that your second USB stick/external HDD/secondary HDD on the target computer (where you have already copied all the necessary files) has the "Z" drive letter, so just replace the "Z" drive letter in all the following commands with the one of your particular case.
D) Install Windows 7 x64 using DISM and apply EFI boot partition from the installation
1) Apply the "install.wim" image from your second USB stick/external HDD/secondary HDD on the target computer to the "W" partition you created earlier, using the following command entered in an elevated (Run as administrator) "Command prompt" window:
DISM.exe /Apply-Image /ImageFile:Z:\install.wim /Index:1 /ApplyDir:W:\
2) After the process is completed, apply EFI boot partition from the installation, using the following command entered in an elevated (Run as administrator) "Command prompt" window:
BCDboot.exe W:\Windows /s S:
E) Install the modified and signed Intel UHD driver from your second USB stick/external HDD/secondary HDD on the target computer to the "W" partition you created earlier, using the following command entered in an elevated (Run as administrator) "Command prompt" window:
dism /Image:W:\ /Add-Driver /Driver:Z:\Intel /Recurse /forceunsigned
F) Disable the legacy vga (which is incompatible with UEFI) from the registry of the installed Windows 7 from the "W" partition you created earlier, using the following commands entered line by line in an elevated (Run as administrator) "Command prompt" window:
set Services=HKLM\loaded_SYSTEM\ControlSet001\Services
reg.exe load HKLM\loaded_SYSTEM W:\Windows\system32\config\system
reg.exe add "%Services%\Vga" /f /t REG_DWORD /v "Start" /d 4
reg.exe add "%Services%\VgaSave" /f /t REG_DWORD /v "Start" /d 4
reg.exe unload HKLM\loaded_SYSTEM
G) Delete legacy vga driver file (which is incomaptible with UEFI) completely from the installed Windows 7 from the "W" partition you created earlier
1) Install "Unlocker" by running "Unlocker1.9.2.exe" from your second USB stick/external HDD/secondary HDD on the target computer.
2) Using "Windows Explorer", go to "W:\Windows\system32\driver" and look for "vga.sys", right-click on it, and choose "Unlocker". A window appears and under "No action" menu, choose "Delete" and then click "OK". Check manually that the file is deleted. You have to use this method, because you can't normally delete "vga.sys" due to security permissions of the installation.
H) Using "Windows Explorer", copy "bootmgfw.efi" from your second USB stick/external HDD/secondary HDD on the target computer to the following path: "S:\EFI\Microsoft\Boot", overwriting the already existing file.
I) Disable legacy vga (which is incompatible with UEFI) from the EFI boot, using the following commands entered line by line in an elevated (Run as administrator) "Command prompt" window:
bcdedit /store "s:\efi\microsoft\boot\bcd" /set {default} bootlog yes
bcdedit /store "s:\efi\microsoft\boot\bcd" /set {default} bootstatuspolicy IgnoreAllFailures
bcdedit /store "s:\efi\microsoft\boot\bcd" /set {default} novesa on
bcdedit /store "s:\efi\microsoft\boot\bcd" /set {default} quietboot on
J) Add the Intel UHD video driver certificate to the Windows 7 installation.
1) Mount the registry of the Windows 7 installation from the "W" drive, using the following command entered in an elevated (Run as administrator) "Command prompt" window:
reg.exe load HKLM\loaded_SOFTWARE C:\Windows\system32\config\software
2) Merge the "cert1.reg" and "cert2.reg" files one by one, by double-clicking them from your second USB stick/external HDD/secondary HDD on the target computer. You should also see a confirmation that the process is successful.
3) Unmount the registry of the Windows 7 installation from the "W" drive, using the following command entered in an elevated (Run as administrator) "Command prompt" window:
reg.exe unload HKLM\loaded_SOFTWARE
V) Reboot and remove all USB sticks from your computer. You should only get a black screen, the installation might take a while, then it should reboot automatically and then you should get video input when "Setup is checking for you system performance", then everything should go as normal.


 . Ill make sure to spread it out, and make a tutorial of it on youtube if you allow me too.